Automatically generate SKUs
Overview
Automatic SKU generation lets SKU Manager assign SKUs to new products and variants for you. Once it is turned on, the app watches for newly created products or newly added variants and prepares them for processing based on the rules you set.
You can keep the setup simple with one rule that applies to everything, or create multiple rules for different parts of your catalog. This is useful if different collections, product types, or vendors need different SKU formats.
Automatic generation only applies to newly created products or newly added variants. Existing variants are not updated by this feature.
VIdeo Overview
Enable automatic SKU generation
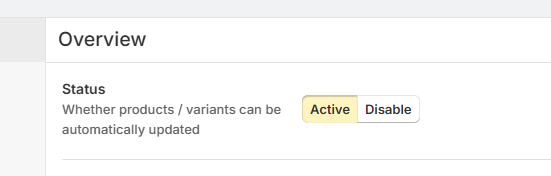
Before any rules can run, the feature must be enabled in the Overview tab.
Go to Automate on the side bar, and open the Overview tab.
Change the feature status to Active. If the feature is disabled, new products and variants will not be processed automatically.
After the feature is active, review your rules to make sure the right products will be matched.
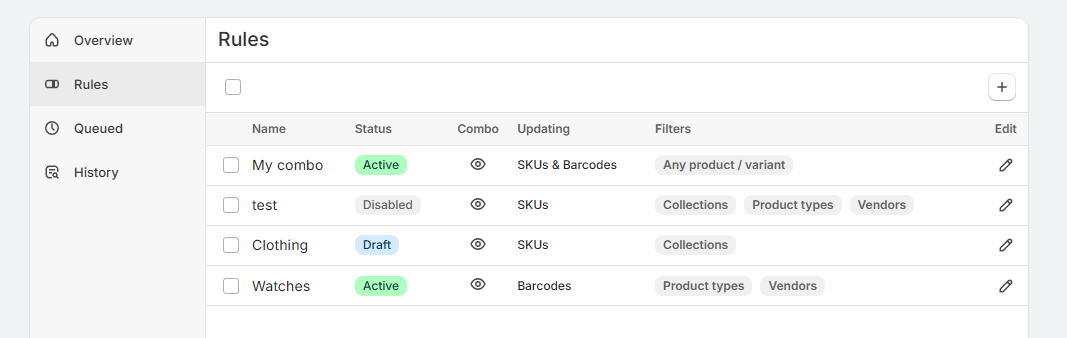
Rules
Rules tell SKU Manager which SKU format to use and which products or variants it should apply to.
Each rule includes:
A combo, which defines how the SKU should be built
Filters, which decide which products or variants the rule should match
When a new product or variant is created, SKU Manager checks your rules and uses the one that matches. This lets you use one SKU pattern for one part of your catalog and a different pattern somewhere else.
For example, you might create separate rules for apparel, accessories, and watches, each with its own SKU format.
Give each rule a clear name that describes what it is for, such as the product group it targets or the SKU format it uses. This makes it much easier to review and update rules later.
Catch-all rules
A rule can target either:
Any product or variant, which acts as a catch-all rule
Only matching products or variants, which applies only when its filters match
You can have only one catch-all rule for any product or variant. SKU Manager uses it as a fallback when none of your more specific rules apply.
If you use multiple rules, make sure your most specific rules are set up correctly. The catch-all rule should be treated as your last-resort rule, not your main targeting method.
Filters and targeting
Filters help you control which products or variants each rule applies to. You can use them to target only the parts of your catalog that need a specific SKU format.
Rules can match products by:
Collection
Product type
Vendor
You can use one filter on its own or combine all three in the same rule for more precise targeting.
When to use filtered rules
Use Collection when products are grouped into curated sets or seasonal lines
Use Product type when similar product categories should share one SKU pattern
Use Vendor when supplier-based products need their own format
If a product or variant does not match a filtered rule, SKU Manager moves on to check the next applicable rule. If nothing matches and you have a catch-all rule, the catch-all rule is used.
Your rule's combo is created using the same combo-building workflow used elsewhere in SKU Manager. Before saving a rule, confirm that the combo and filters show no issues.
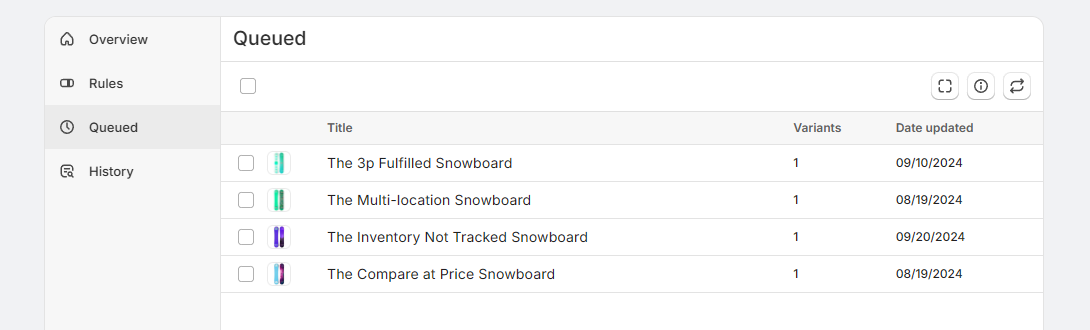
Queued
When a new product is created or a new variant is added, SKU Manager adds it to the Queued tab. This queue is the list of items waiting to be processed by your automatic rules.
Queued items are not always updated instantly. Processing happens on a schedule, typically processed every 20 minutes.
Only 100 products can be queued at any given time. This limit depends on your plan.
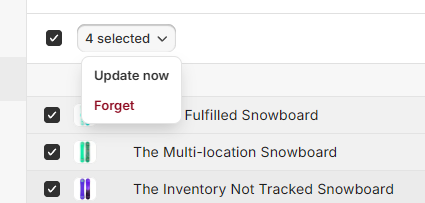
What you can do in the queue
Review waiting items before they are processed
Select one or more items to act on them in bulk
Use Update now to process selected items sooner instead of waiting for the next scheduled run
Use Forget to remove selected items from the queue without processing them
If you have just added new products and want their SKUs assigned right away, use Update now on the queued items you want to process immediately.
Using Forget removes items from the queue. If you do not want an item to be skipped, do not remove it.
How are products queued
When a product is created or duplicated.
When a variant is created.
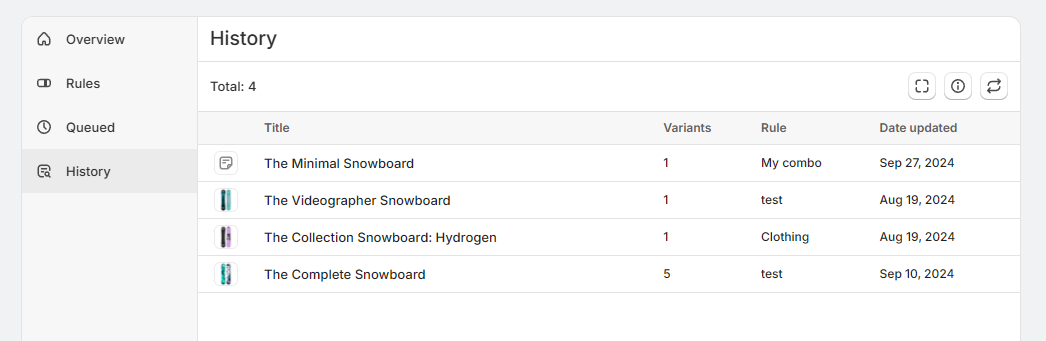
History
After a queued item is processed, it appears in the History tab. History gives you a record of what was updated and which rule was used.
For each processed item, you can review details such as:
The product title
The number of variants updated
The rule used
The date updated
This is the best place to confirm that your automation is working as expected. If an item was updated with the wrong SKU format, check the rule listed in History and then review that rule's filters and combo.
History is especially helpful when you use multiple rules, because it shows exactly which rule handled each processed product or variant.
Recommended setup
Set automatic SKU generation to Active in the Overview tab.
Add rules for the collections, product types, or vendors that need custom SKU formats.
Create a single Any product or variant rule to handle anything that does not match your specific rules.
Check the Queued tab after adding products or variants, especially during initial setup.
Use the History tab to confirm that the correct rules were applied.
Best practices
Name rules clearly so they are easy to identify later
Use filtered rules for product groups that need different SKU formats
Check History after making rule changes to confirm the right rule is being applied